French tips look simple until you try to paint them yourself.
A clean smile line asks for more control than people expect. One side gets too thick. The curve drifts upward. The white polish drags. Then you spend ten minutes “fixing” a line that only gets worse every time you touch it.
That is why the right brush matters so much here. French tips are not a general nail art problem. They are a shape problem. You are painting a curve across a small surface, and the brush either helps that motion or works against it.
Most roundups get this wrong by tossing French brushes into a larger list of art tools and moving on. That does not answer the real question, which is this: what brush gives you the cleanest French tip for the style you actually wear?
This guide breaks down the best nail brush for French tips, who should use each type, and the setup that makes the job easier at home.
The Short Answer
If you only want one answer, buy an angled flat brush.
For most DIY users, that is the most forgiving brush for classic French tips because the angled edge helps guide the curve instead of forcing you to sketch it freehand. If you like very thin micro French tips, add a fine liner brush. If you want cleanup insurance, keep a cleanup brush next to both.
So the smartest French tip setup is usually:
angled flat brush for the main smile line; fine liner brush for skinny or graphic tips; cleanup brush for sharpening edges
Not one brush for everything. Three tools, three jobs.
Why French Tips Are Harder Than They Look
The issue is not only hand stability. Product flow matters too.
French tips go wrong when:
the brush holds too much polish; the tip is too thick to make a smooth curve; the bristles spread when they touch the nail; the handle feels slippery or too light; you keep going back over a line that should have been one motion
That is why a random detail brush does not always work well. French tips need a curve-friendly shape and enough control to keep the edge crisp.
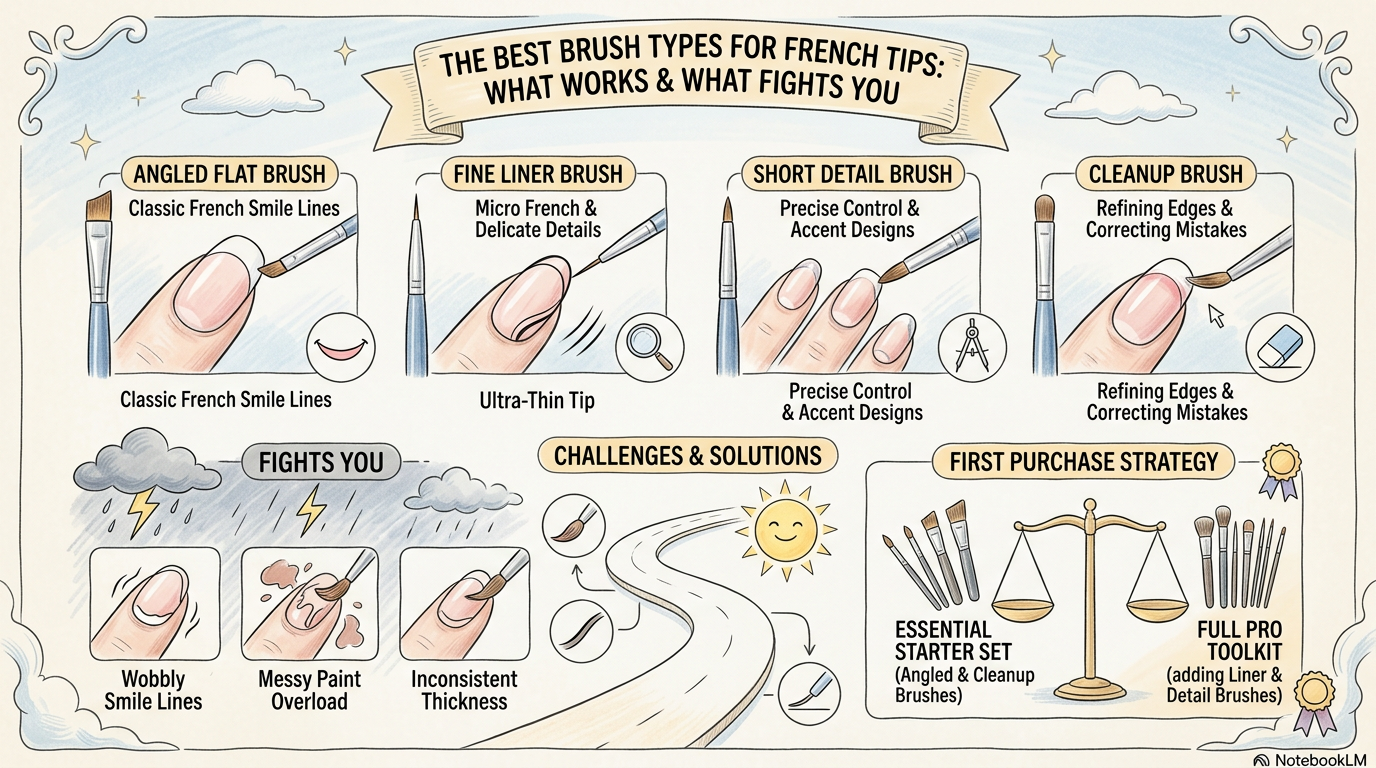
The Best Brush Types for French Tips
Not every French tip uses the same brush. These are the ones worth knowing.
1. Angled Flat Brush - Best for Most People
If you are doing classic French tips, this is the best place to start.
The angled edge naturally follows the smile line better than a blunt flat brush. It also gives you a wider contact area, so you can guide the curve instead of drawing it with tiny shaky strokes.
Best for:
classic white French tips; soft almond or oval smile lines; medium-width tips; beginners who want more control
Watch for:
a clean slanted edge; bristles that stay together; enough firmness to push polish, but not so much that the brush skips
If your current French tips always look choppy, this is probably the brush you are missing.
2. Fine Liner Brush - Best for Micro French Tips
If you love very thin French tips, side French lines, double French details, or graphic curved edges, a liner brush makes more sense.
The long, narrow bristles help you pull one smooth line around the tip. But there is a trade-off. It asks for more control than an angled brush. If your hands are still shaky, the liner can feel slippery fast.
Best for:
micro French tips; colored outline French tips; double-line French designs; square tips with a very slim edge
Good for precision. Less forgiving for beginners.
3. Short Detail Brush - Best for Small Corrections and Short Nails
Some people do better with a shorter brush because it feels more anchored. That is where a short detail brush helps.
You lose some flow, but you gain control. It is a good choice for short nails, tiny smile lines, or people who hate the loose feel of a longer liner.
Best for:
short natural nails; compact smile lines; tiny corrections before top coat; people who want a closer, steadier feel
4. Cleanup Brush - Best Support Tool, Not Main Brush
This is not your painting brush. It is the rescue brush.
A cleanup brush dipped lightly in remover can sharpen the underside of the French tip, fix uneven thickness, and make the whole line look more intentional. If you do French tips without one, you are making the job harder than it needs to be.
Best for:
tightening the smile line; fixing sidewall overflow; refining white tips after placement; cleaning negative space designs
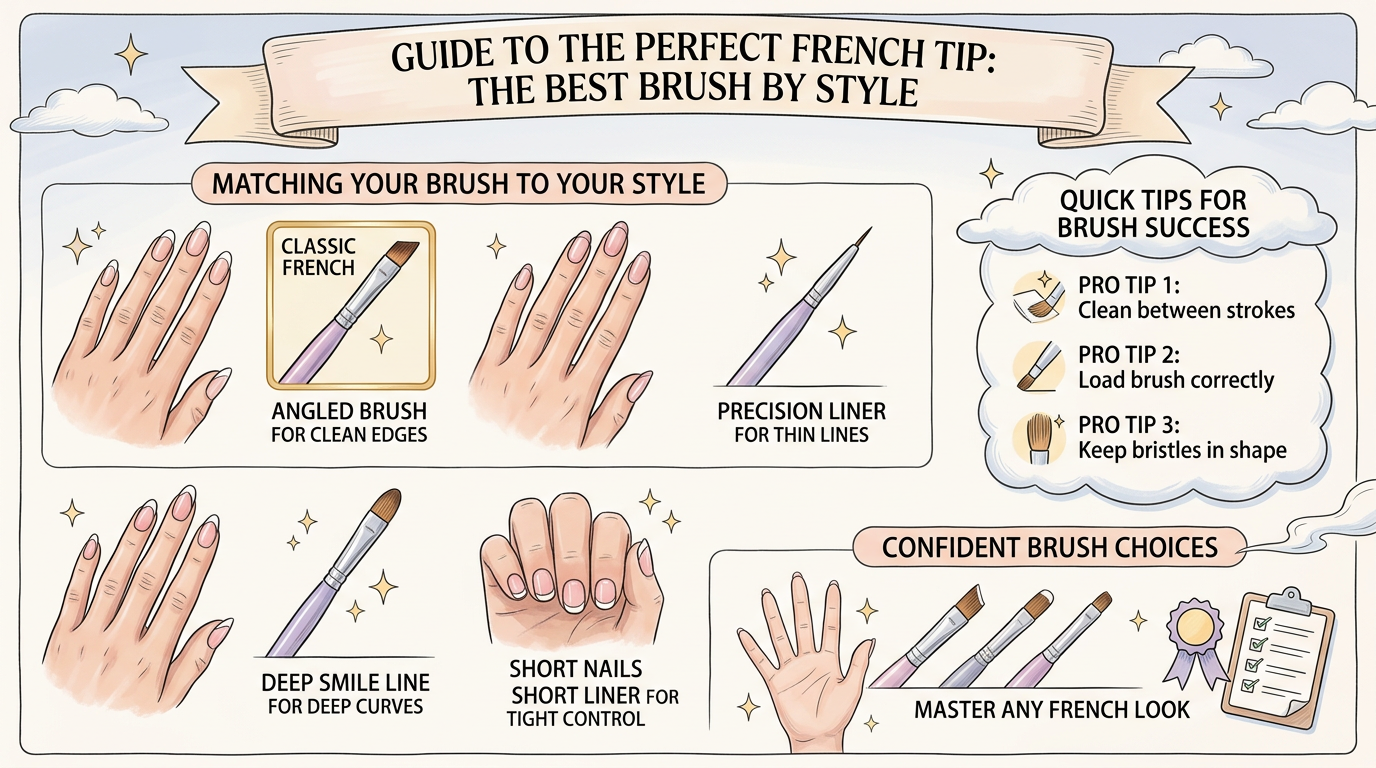
The Best Brush by French Tip Style
This is where the decision gets easier.
Classic White French
Use an angled flat brush.
This is still the easiest way to get a smooth, balanced smile line on almond, oval, and soft square nails.
Micro French
Use a fine liner brush.
You need less product and more line control here. A flat brush usually lays down too much width.
Deep Smile Line French
Use an angled brush, then refine with a cleanup brush.
That deeper curve can look dramatic and elegant, but it gets messy fast if the first placement is too heavy.
Side French or Outline French
Use a liner brush.
These designs depend on controlled line work more than full tip coverage.
French Tips on Very Short Nails
Use a short detail brush or a very small angled brush.
Short nails leave less room for correction. A brush that feels too long can make the tip look bulky.
What Makes a Good French Tip Brush
Do not buy by category name alone. Two brushes with the same label can behave very differently.
Bristle Shape
The edge should look even and intentional before first use. If it arrives splayed, that brush is already telling you how the manicure will go.
Firmness
French tips need controlled resistance. Too soft, and the line wobbles. Too stiff, and the brush drags product instead of placing it.
Product Load
A good French brush should carry enough polish to finish the curve without flooding the tip. Brushes that hold too much product make thick, puffy smile lines.
Handle Feel
Tiny design work gets harder when the handle feels cheap or slippery. You do not need a luxury tool. You do need one that feels stable in your hand.
Size Match
One brush does not fit every nail length or shape. Longer almond nails can handle a slightly larger angled brush. Short square nails often need something tighter.
Regular Polish vs Gel for French Tips
The brush choice changes a little depending on the product.
With Regular Polish
You need to move fast and avoid overworking the line. Regular polish starts setting sooner, so the brush has to place the tip cleanly on the first pass.
Best tools:
angled flat brush; liner brush for micro French; cleanup brush
With Gel
Gel gives you more time. That makes liner work easier and lets you refine the curve before curing.
Best tools:
angled gel brush or French brush; liner brush for detail French designs; cleanup brush or dry detail brush for refinement
If you are new, regular polish is fine for learning shape control. If you already do gel manicures, gel can make French tips less stressful because the product does not rush you.
The Brush Mistakes That Ruin French Tips
This is where most frustration comes from.
Using a Brush That Is Too Big
Large brushes make thick tips and clumsy corners, especially on short nails.
Using a Brush With Split Bristles
Even a tiny split shows up immediately in a French line. The tip has to stay clean.
Loading Too Much Polish
French tips look better with controlled product. Too much polish floods the edge and softens the smile line.
Trying to Paint and Correct With the Same Brush
Paint with one brush. Refine with another. That is the cleaner system.
Forcing a Liner Brush for Every Style
A liner is great for micro French. It is not automatically the best tool for every classic white tip.
A Better Way to Paint French Tips
The brush matters. The motion matters too.
Try this:
1. Paint the center of the tip first.; 2. Guide the curve from one side toward the middle.; 3. Repeat on the other side.; 4. Use the cleanup brush to sharpen the lower edge.
That is usually easier than trying to draw one perfect arc in a single dramatic stroke.
If you are using an angled brush, let the slant help you. Rotate the finger slightly instead of twisting your wrist into a weird position.
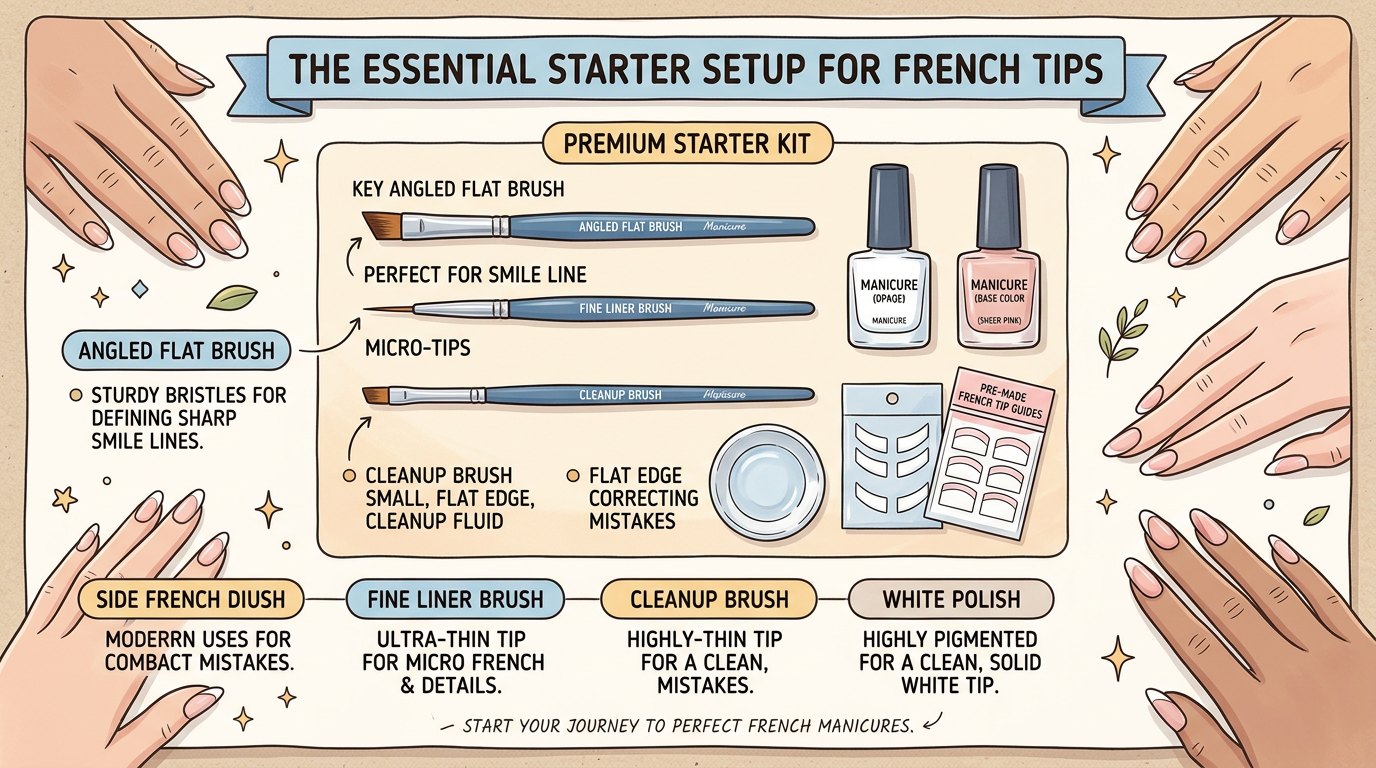
The Best Starter Setup for French Tips
If your goal is to get good at French manicures at home, start here:
1. Small angled flat brush; 2. Fine liner brush; 3. Cleanup brush; 4. White polish or French gel; 5. Neutral base color
That is enough for:
classic French; micro French; colored French; side French; double French accents
You do not need a huge brush collection before you can get a clean result.
Which Brush Should You Buy First?
Use this shortcut.
Buy an angled flat brush first if:
you are a beginner; you want classic French tips; your smile line usually looks shaky
Buy a fine liner first if:
you prefer thin modern French tips; you already have decent line control; you like graphic or double-line French designs
Buy both if French tips are one of your main manicure styles.
Final Verdict
The best nail brush for French tips is usually an angled flat brush, because it gives most people the easiest path to a clean smile line. A liner brush is excellent for micro French and graphic tip work, but it asks for steadier control. A cleanup brush is the quiet hero that makes both look better.
If your French tips keep coming out uneven, do not assume the problem is your skill. Often the brush is simply wrong for the shape you are trying to paint.