French tips look easy right up until you try to paint one.
Then the line gets too thick. One side climbs higher than the other. The white polish smears into the nude base. You wipe it off, try again, and the nail somehow looks worse every round.
That is why most people do not need another pretty French manicure roundup. They need a method that actually answers the home-manicure problems: how to prep, how to control the tip shape, how long to wait between layers, and what to do when the line goes wrong halfway through.
This guide is built for that. It walks through the cleanest way to do French tips at home, the easiest method for beginners, how to adjust the tip for different nail shapes, and how to fix the mistakes that usually ruin the set.
The Short Answer
If you want the easiest at-home French tip routine, do this:
1. Shape and prep the nail.; 2. Apply a sheer nude or milky base.; 3. Let it dry properly.; 4. Use an angled brush, liner brush, or stamper method to place the tip.; 5. Clean the smile line with a cleanup brush.; 6. Seal everything with top coat.
If you are a complete beginner, start with a thin classic French on short or medium nails. Do not make your first attempt a deep almond smile line with bright white polish and no cleanup brush. That is how people talk themselves into thinking they are bad at French tips.
Why French Tips Go Wrong So Fast
The design itself is simple. The control is not.
French tips fail for a few predictable reasons:
the base is still tacky when you paint the tip; the white polish is too thick; the brush is too big or too blunt; the tip is placed too wide for the nail shape; you try to perfect the line while it is already starting to set
Most guides mention the steps, but they do not spend enough time on those failure points. That is the part that matters when you are working at home without salon speed or salon muscle memory.
What You Need Before You Start
You do not need a massive kit. You do need the right few tools.
Use this setup:
nail file; buffer; base coat; sheer nude, pink, or milky polish; white or soft cream tip polish; angled brush or fine liner brush; cleanup brush; remover or acetone; top coat; cuticle oil
If you want the easiest symmetry shortcut, add one more thing:
silicone stamper
That last tool is useful if you struggle with even tip placement. It gives a cleaner curve than freehand for a lot of beginners.
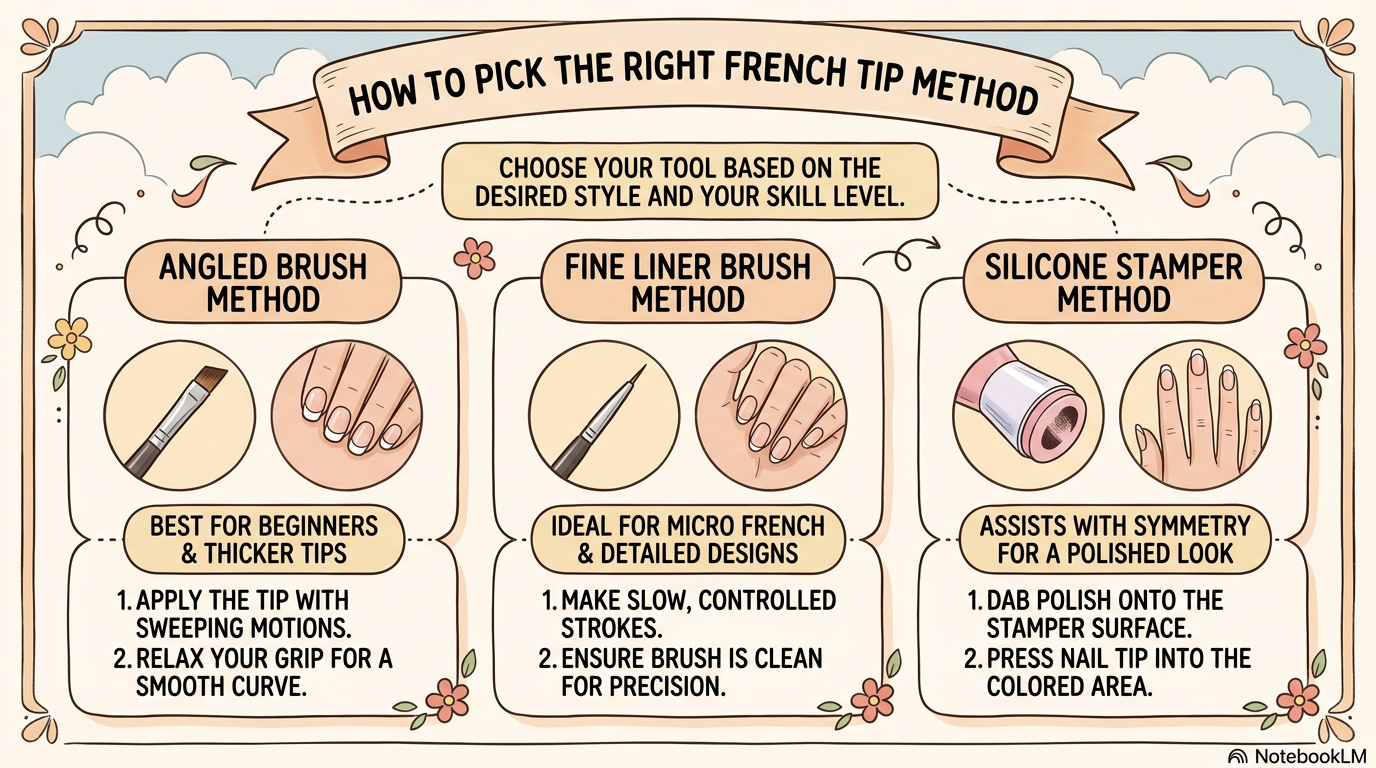
Pick the Right French Tip Method
There is no single best method for every hand. Choose based on your control level.
Method 1: Angled Brush
This is the best starting method for most people.
An angled brush helps guide the curve instead of making you sketch it in tiny broken strokes. It works especially well for classic French tips on almond, oval, and soft square nails.
Best for:
beginners; classic white French; medium-width smile lines; regular polish or gel
Method 2: Fine Liner Brush
This is better for thinner, cleaner, more modern French tips.
The liner gives you sharper control for micro French, side French, and double-line tips. It is less forgiving if your hand is shaky, but it is worth using once your control improves.
Best for:
micro French tips; graphic French; colored French outlines; square nails with a thin edge
Method 3: Stamper Method
This is the closest thing to a symmetry cheat code.
You paint a thin line of polish onto a silicone stamper, then dip the nail tip into it at an angle. That creates a neat curve faster than freehand for many beginners.
Best for:
people who cannot keep both hands even; short natural nails; very crisp classic French; fast touch-ups
If freehand French tips keep frustrating you, this is the first alternate method I would test.
Prep Matters More Than People Think
French tips expose mistakes. A rough edge, oily nail plate, or uneven shape shows up immediately.
Before you touch polish:
1. Shape the Nail First
Decide the final shape before the base color goes on.
French tips look cleaner when the smile line matches the free edge. If the nail is slightly crooked, the French tip will exaggerate it.
2. Lightly Buff the Surface
Do not over-buff. Just remove enough shine to help the base coat sit evenly.
3. Clean the Nail Plate
Remove dust and surface oil before base coat. If the plate is slick, the base layer can slide, and the tip line becomes harder to control later.
4. Push Back the Cuticle Area
You do not need aggressive cuticle work. You do need a clean starting line so the manicure looks finished.
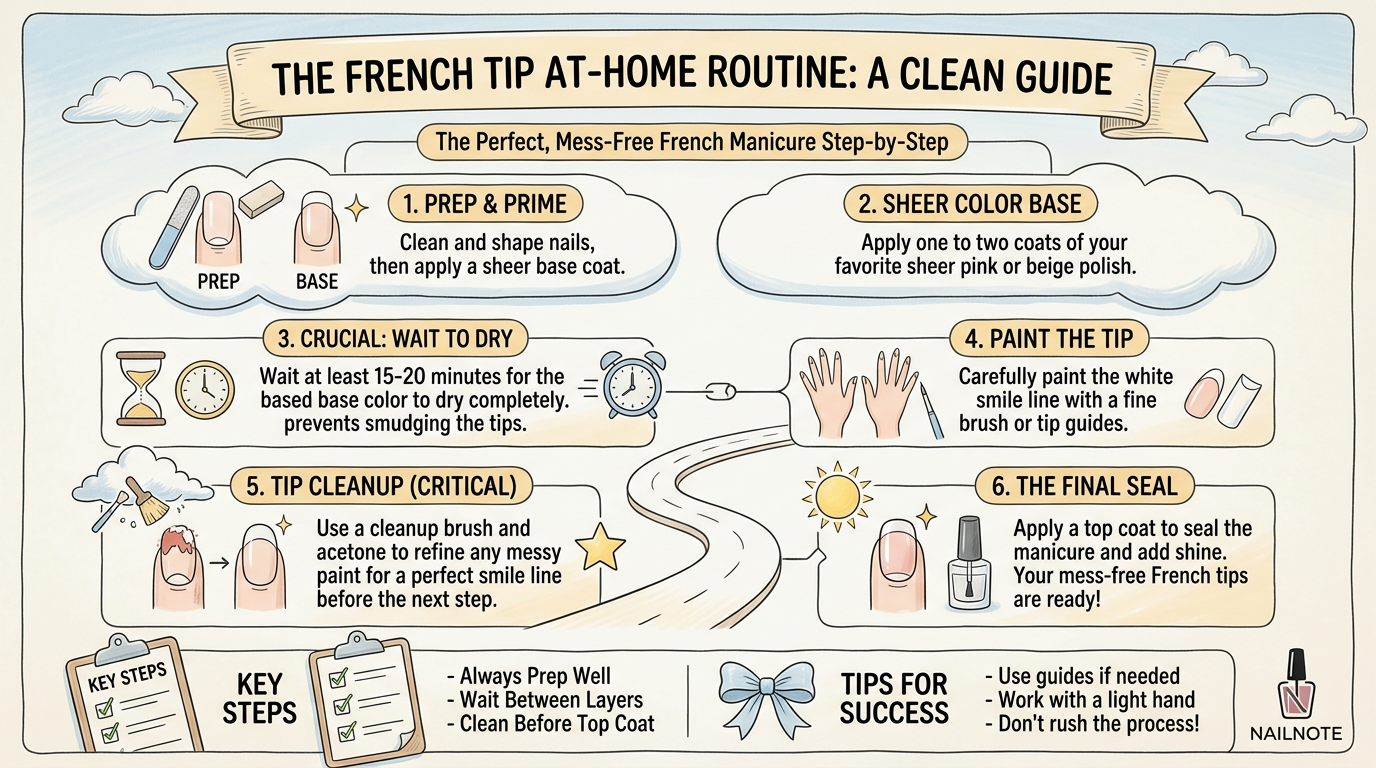
The Step-by-Step French Tip Routine
This is the version that works best for most at-home users.
Step 1: Apply Base Coat
Use a thin layer. Let it set fully.
Step 2: Apply Your Sheer Base Color
Choose a nude, soft pink, or milky shade that flatters your skin tone.
One coat gives a cleaner, modern look. Two coats give more blur and more polish between your natural nail and the white tip. Both can work. Just keep the layers thin.
Step 3: Wait Longer Than You Think
This is one of the biggest mistakes in DIY French tips.
If the base is not dry enough, the white tip drags into it, dents it, or leaves a groove when you clean the line. Give it enough time to set before you start the tip. If you rush here, the rest of the manicure becomes a rescue mission.
Step 4: Paint the Tip
If you are using an angled brush:
1. Place a little polish at the center edge.; 2. Pull one side of the smile line toward the middle.; 3. Repeat on the other side.; 4. Fill the tip only after the outline looks right.
If you are using a liner brush:
1. Load less product than you think you need.; 2. Start at one sidewall.; 3. Pull a thin curve across the free edge.; 4. Build thickness slowly, not all at once.
If you are using the stamper method:
1. Paint a thin line of white polish onto the stamper.; 2. Angle the nail tip into it.; 3. Lift straight out.; 4. Clean any extra polish with a cleanup brush.
Step 5: Refine the Smile Line
Use a cleanup brush dipped lightly in remover.
This is where the manicure starts looking intentional. You do not need to repaint the whole tip every time something is off. Often you just need to sharpen the bottom edge.
Step 6: Let the Tip Dry
Do not go straight to top coat if the white is still soft. That is one of the fastest ways to drag the line.
Step 7: Seal With Top Coat
Float the top coat over the nail instead of pressing down hard with the brush. That protects the French line and helps the whole manicure look smoother.
Step 8: Finish With Cuticle Oil
The manicure looks better instantly, and the skin around the nail stops looking dry and chalky.
How Wide Should the Tip Be?
This is where shape matters.
One reason French tips look off is that people use the same tip width on every nail shape.
Short Nails
Keep the tip thin. A thick white tip makes the nail look shorter.
Almond Nails
You can let the smile line curve a little deeper, but keep it elegant. Too much width starts looking heavy.
Square Nails
A straighter, slimmer tip usually looks better. If the line gets too rounded, it can fight the shape.
Coffin or Long Tapered Nails
You have more room to play with depth, but symmetry matters more. A deep smile line looks great when clean and terrible when uneven.
If you are unsure, go thinner first. It is easier to add a little width than to remove bulk from a finished tip.
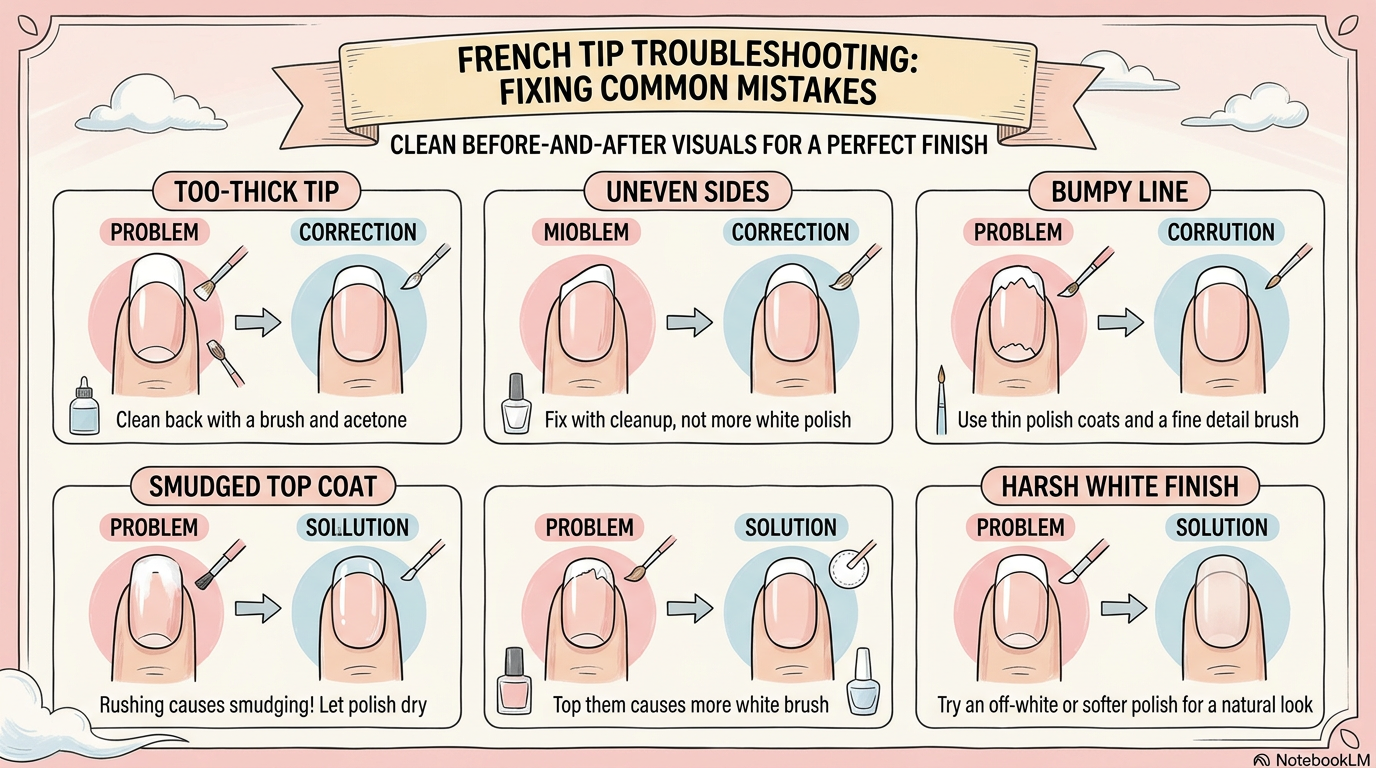
The Mistakes Most People Need Help Fixing
This is the part most French tip guides skip too quickly.
The White Tip Looks Too Thick
Cause:
too much product; brush too large; trying to cover the tip in one pass
Fix:
Use less polish, redraw the curve thinner, and clean the lower edge with a cleanup brush.
One Side Is Higher Than the Other
Cause:
uneven starting point; hand angle changed halfway through
Fix:
Stop adding more white to the lower side. Instead, shave back the higher side with a cleanup brush. That usually fixes symmetry faster.
The Line Looks Bumpy
Cause:
polish too thick; base not dry enough; too many correction passes
Fix:
Use thinner polish, fewer strokes, and let the base set longer next time.
The Tip Smudged Under Top Coat
Cause:
top coat applied too soon; too much pressure from the brush
Fix:
Let the tip dry longer, then float the top coat across the nail.
The White Looks Harsh
Cause:
bright white against the wrong base; tip width too heavy
Fix:
Try a creamier white or finish with a sheer nude veil over the whole nail for a softer vanilla French effect.
Regular Polish or Gel?
Both work. They just fail differently.
Regular Polish French Tips
Pros:
lower cost; easier to start with; no lamp needed
Cons:
shorter working time; easier to smudge; cleanup window closes faster
Gel French Tips
Pros:
more time to refine; easier to perfect the smile line before curing; longer wear
Cons:
higher upfront cost; more removal steps; more room for overbuilding the service if you are still learning
If you already do gel manicures, gel French tips are often easier. If you are still learning shape control, regular polish is fine and cheaper to practice with.
The Fastest Beginner-Friendly French Tip Setup
If you want the lowest-stress version, use this:
1. Short or medium nail length; 2. Soft square or almond shape; 3. Sheer pink or milky base; 4. Thin white tip; 5. Angled brush or stamper method; 6. Cleanup brush on standby
That combination gives you the best shot at a clean first result without fighting difficult proportions.
Final Verdict
The cleanest at-home French tip routine is not about painting the perfect white line in one magical stroke. It is about prep, brush choice, drying patience, and knowing how to correct the line without rebuilding the whole nail.
If you want the easiest route, start with an angled brush or stamper method, keep the tip thinner than you think, and use a cleanup brush early instead of trying to paint your way out of every mistake.
That is how French tips start looking polished instead of stressful.