Pick a tutorial. Get your toothpick. Let's go.
The Problem Nobody Talks About
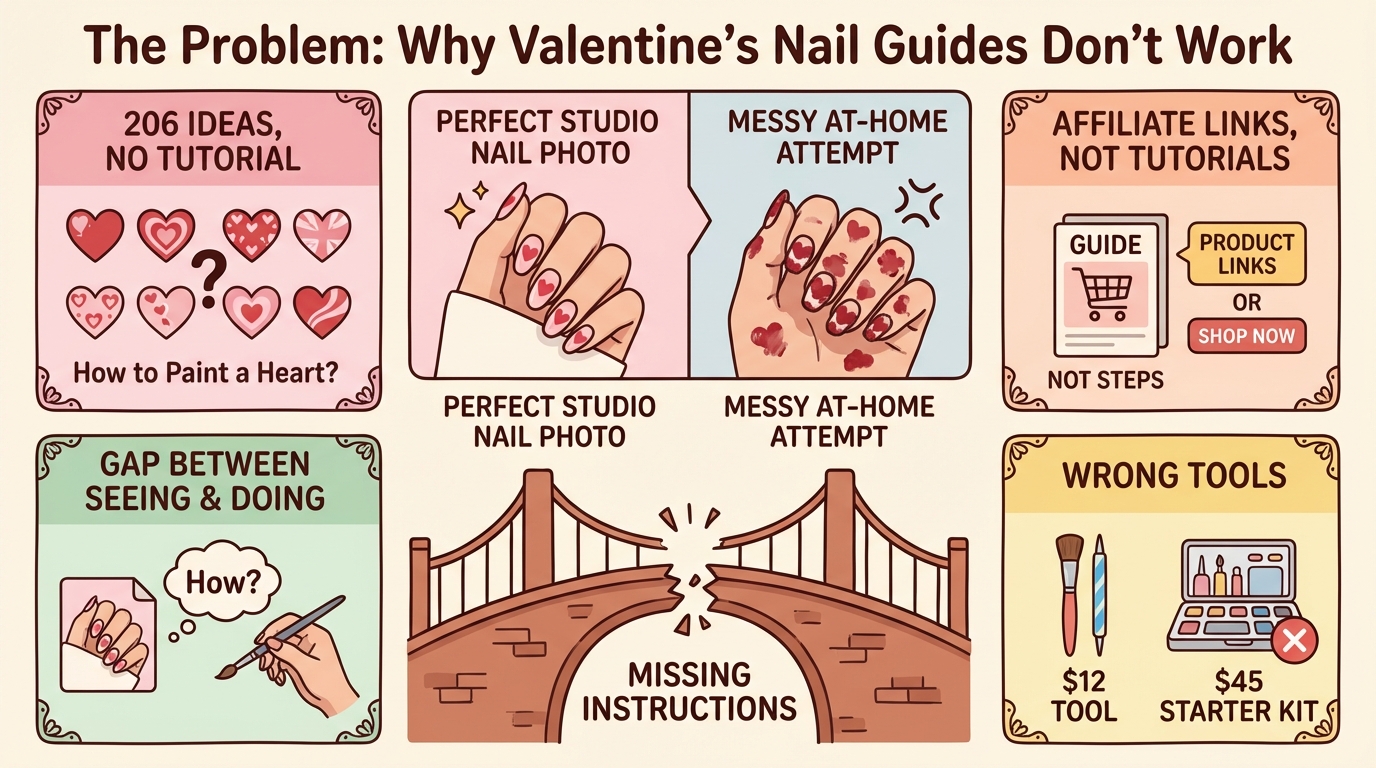
Here's what happens in real life. You save a screenshot of a gorgeous marble nail design. You buy the polish. You sit down on a Sunday afternoon. And within ten minutes, you're staring at what looks like a crime scene on your thumbnail, wondering why the red and white swirled into a muddy pink smear instead of elegant marble veins.
Nobody told you that you need to swirl while the polish is still wet—but only with two or three strokes. Nobody mentioned that you should drop the color in tiny dots, not thick globs. Nobody warned you that the toothpick needs to barely touch the surface.
The problem with inspiration-only content is that it skips the entire middle. It goes from "look at this beautiful thing" straight to "go try it!" without any of the technical information that determines whether you succeed or fail. And when you fail—because of course you fail, you were set up to fail—you blame yourself instead of the guide that gave you nothing to work with.
What You Actually Need (Not What They're Selling)
Total cost: under $12.
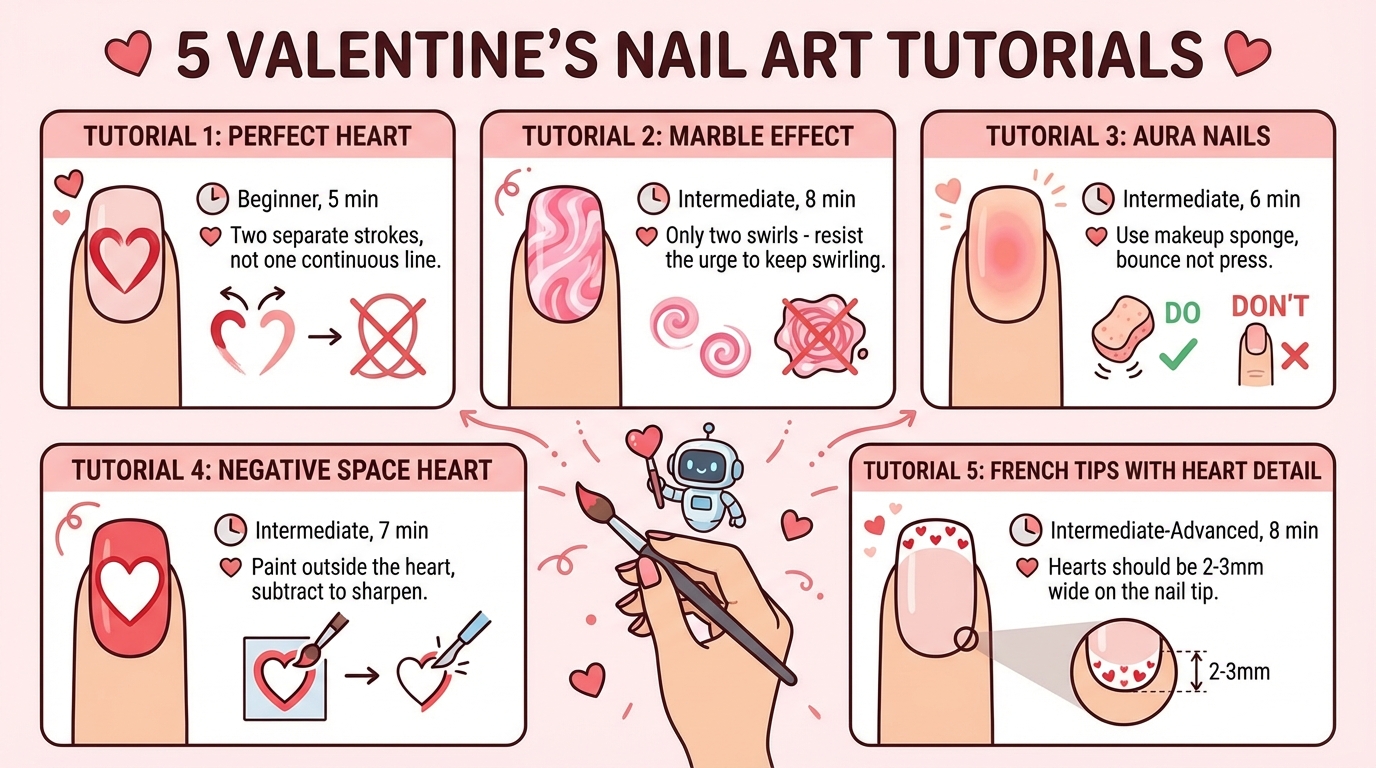
5 Valentine's Nail Art Tutorials
The Magnetic 'Cat Eye' Heart
The viral trend that drives everyone crazy. You use magnetic polish and a magnet, but instead of a random line, you force it into a heart. Most people fail because they don't know the Paperclip Hack.
- Apply a black or deep red base. Let it dry completely.
- Apply a thick layer of Magnetic 'Cat Eye' polish on one nail at a time. Do NOT cure/dry yet.
- The Paperclip Hack: Bend a paperclip into an 'L' shape and attach your small magnet to the end. This allows more precision than the big wand.
- Hold the magnet at a 45-degree angle starting from the cuticle, pushing the shimmer toward the center.
- Quickly move to the tip and push upward. The shimmer will meet in the middle.
- Immediately use a dotting tool to 'drag' the center of the shimmer downward while it's still fluid to create the V-point of the heart.
- Flash cure (if gel) or wait for it to set immediately.
- Shimmer is blurring: Your magnetic layer is too thin or you took too long to move the magnet.
- Heart is distorted: Your magnet is too far away (keep it 2mm from the surface).
- Secret: You MUST cure/dry immediately after the shimmer forms, or it will drift back out.
The Perfect Heart
Everyone starts here and almost everyone does it wrong the first time. The secret is that a heart is not one continuous line. It's two separate strokes.
- Paint your base color. Let it dry fully. Ten minutes minimum. If it's tacky, the heart will drag through the base.
- Load your dotting tool with your heart color. Not too much—you want a controlled dot, not a puddle.
- Place two dots side by side on the nail, slightly overlapping. The space between their centers determines the width of your heart. Closer together = narrow heart. Further apart = wide heart.
- Take a toothpick or thin brush. Starting from the outer edge of the left dot, drag downward at a 45-degree angle toward center.
- Repeat from the outer edge of the right dot, meeting the first line at a point below.
- If the point looks blunt, use the tip of the toothpick to gently extend it.
- The two sides don't meet at the same point. Fix: don't try to match them perfectly. Make the point slightly longer than needed, then clean up with a brush dipped in your base color. Build the heart from the outside in, not the inside out.
Marble Effect
Marble nails look complicated. They're not. The technique is simple. The challenge is resisting the urge to keep swirling.
- Apply a white base coat. Let it dry completely. White is essential—it makes the marble veins pop.
- On the dry white base, apply a fresh, thin layer of clear top coat. Work quickly from here.
- While the top coat is still wet, drop 3-4 tiny dots of red polish onto the surface. Use the very tip of a toothpick to pick up minimal polish.
- Drop 2-3 dots of pink between the red dots.
- Take a clean toothpick. Starting from one edge, drag ONE slow line through the dots. Just one.
- Turn the toothpick slightly and drag one more line in a different direction.
- Stop. Seriously, stop. Two swirls is enough. Three is pushing it. Four ruins it.
- Over-mixing. Every time. You swirl and swirl because it doesn't look "marbled enough" and suddenly you have a flat mauve nail. The marble effect comes from the contrast between the colors. Mixing destroys that contrast. Two swirls. Walk away.
Aura Nails
That soft, glowing gradient effect you see everywhere on Instagram. It looks like it requires an airbrush. It doesn't. It requires a makeup sponge and about six minutes.
- Apply a white base. Let it dry. The white acts as a bright background that makes the aura pop.
- Take a small piece of makeup sponge. On one surface, apply a blob of pink polish in the center.
- Around the pink, apply red polish. The colors should be touching but not mixed on the sponge.
- Position the sponge over your nail so the pink blob aligns with the center of the nail.
- Lightly bounce the sponge onto the nail. One or two bounces. Don't press hard—you want a diffused transfer, not a stamp.
- Let it dry for two minutes. If the color isn't intense enough, do one more bounce with fresh polish on the sponge.
- Clean the skin around your nail with an acetone brush before applying top coat.
- Pressing too hard. A heavy press transfers too much polish and eliminates the gradient. Think of it like blotting, not stamping. Also, if the sponge is too wet, the polish pools instead of misting. Dab off excess on paper first.
Negative Space Heart
This is the design that gets the most compliments relative to its difficulty. Your natural nail shows through a heart-shaped cutout, surrounded by color. It's modern, it's graphic, and it makes people think you know what you're doing.
- No base color on the nail. Apply only a clear base coat and let it dry. Your natural nail IS part of the design.
- Using a thin brush loaded with your chosen color (red works best for contrast), paint a heart outline on the nail. Start with the two bumps at the top, then draw the V downward.
- Now paint everything OUTSIDE the heart with the same color. Work carefully around the outline, filling in from the edges inward.
- Leave the inside of the heart completely unpainted. Your natural nail color shows through.
- Apply a glossy top coat over everything—the painted area and the bare heart. This unifies the finish.
- The heart outline wobbles. And it will, because outlining a shape freehand on a tiny curved surface is genuinely hard. Fix: paint a slightly larger heart than you intended. Then use a cleanup brush dipped in acetone to sharpen the edges from outside. Subtracting is easier than adding.
French Tips with Heart Detail
A Valentine's French manicure where the tip isn't a straight line—it's a row of tiny connected hearts. Looks complex. The technique is repetitive, which actually makes it easier once you get the rhythm.
- Apply a nude or light pink base. Let it dry.
- Using a thin brush with red polish, start at one side of the nail tip.
- Paint a tiny V shape (the bottom of a heart) pointing downward. Keep it small—maybe 2mm wide.
- Next to it, paint another tiny V. And another. Connect them along the entire tip edge.
- Go back to the top of each V and add two small bumps to complete each heart shape.
- The hearts don't need to be perfect or identical. Slight variation looks handmade and intentional.
- Making the hearts too big. On a fingernail, each heart in this row should be about 2-3mm wide. Any bigger and you only fit one or two, which defeats the effect. Practice the size on paper first—draw a row of hearts that would fit within a 1cm line. That's the scale you're working at.
The Real Cost: DIY vs. Salon
Salon
A basic Valentine's manicure with simple nail art costs $40-65 at most salons. If you want anything in the "advanced" category—3D elements, chrome, encapsulated designs—that's $80-120 or more.
DIY
The total tool investment for every tutorial in this article: about $12, plus polish you probably already own. Even if you buy three new polish colors at $9 each, your total spend is $39—less than one salon visit. And you keep all the tools.
A trained tech will produce cleaner results, but DIY pays for itself.