Valentine's Nail Prep: Getting Your Canvas Ready
Skip this section and your manicure will chip by February 15th. Every professional nail tech will tell you the same thing: 80% of longevity comes from prep, not the polish.
One week before Valentine's Day:
Start moisturizing your cuticles daily. Jojoba oil, cuticle oil, even plain olive oil works. Dry, ragged cuticles make any manicure look rough no matter how good the nail art is. Push them back gently after a shower when they're soft. Don't cut them unless you really know what you're doing—cutting cuticles unevenly is worse than leaving them alone.
The day before or day of:
1. Remove old polish completely. Use acetone for stubborn glitter or gel; non-acetone for regular polish. 2. File your nails into your chosen shape. File in one direction only. Back-and-forth sawing creates micro-tears in the nail that lead to peeling and breakage within days. 3. Buff the surface lightly—one or two passes, not ten. You want to remove the shine so polish adheres, not sand your nails down to paper. 4. Wash hands with soap to remove all oil and dust. This is the step people forget. Any residual oil between your nail and the base coat creates a slip layer that causes lifting. 5. Apply base coat. Let it dry fully. Not almost dry. Fully.
Timing it right: If your Valentine's plans are Saturday evening, do your nails Thursday night. This gives you a full day for any needed touch-ups and lets the polish fully cure. Fresh-that-morning nails are fragile nails.
--- MAINTENANCE TIPS ---
You did all that work. Don't let it chip on February 13th.
Apply thin coats. Two thin coats of color dry faster and adhere better than one thick coat. Thick coats bubble, smear, and peel. Every time.
Cap the free edge. Run your brush along the tip of each nail with every coat—base, color, and top coat. This seals the edge where chips start. Most people skip this. Most people get tip chips on day two.
Reapply top coat every other day. This alone can extend a manicure by three to four days. A fresh layer of Seche Vite on day two and day four keeps the shine up and the protection layer intact.
Wear gloves. Washing dishes, cleaning with chemicals, long hot showers—all of these break down polish. Rubber gloves for dishes. Shorter, cooler showers. It sounds extreme. It works.
Avoid the first two hours. Even "quick-dry" polish needs time to fully harden. Don't dig through your bag, text aggressively, or peel oranges for at least two hours after finishing. The surface feels dry. Underneath, it's not.
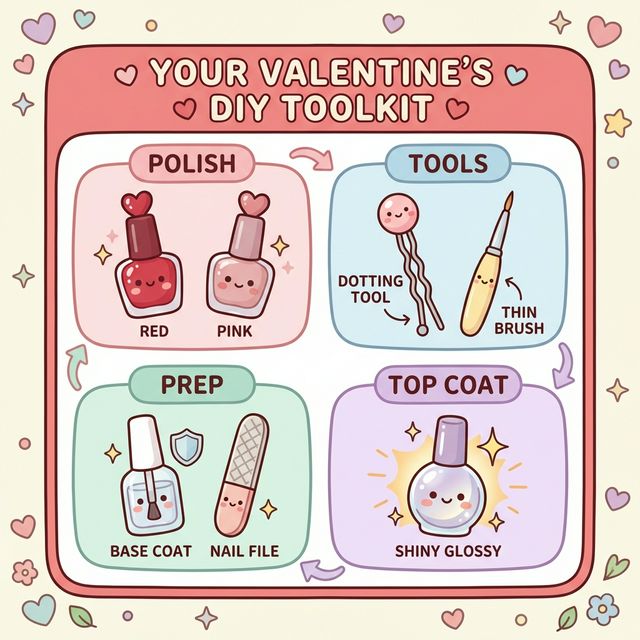
Essential Tools and Products
2026 Color Palette: Powdered lavender, strawberry glaze, vampy bordeaux, milky white, and chrome pink.
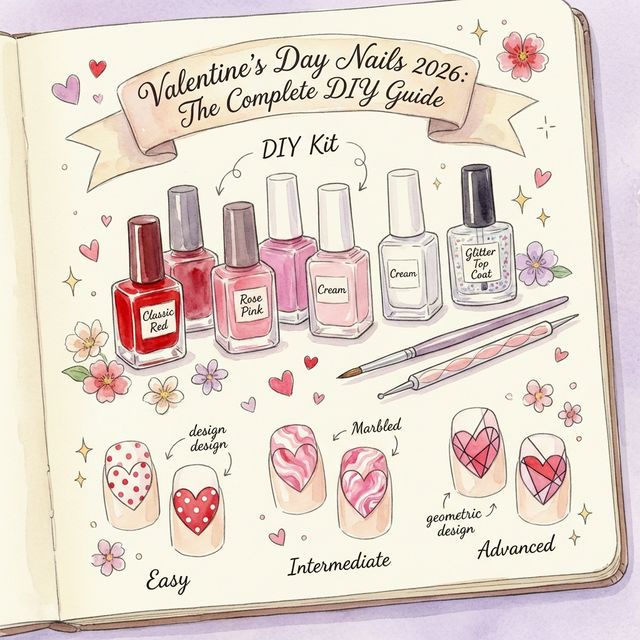
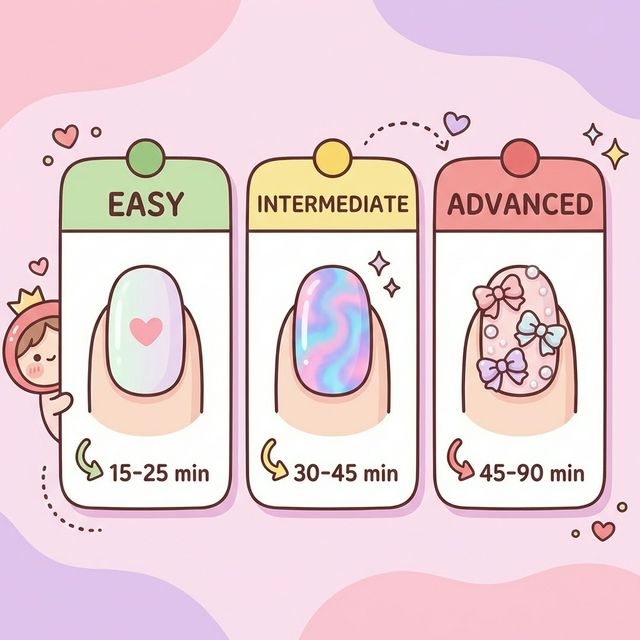
40+ Designs by Skill Level
1. Classic Red Solid
Tools: Red polish, top coat
The simplest and arguably the most powerful Valentine's look. A clean, glossy red on well-shaped nails says more than any elaborate design. Two thin coats. One top coat. Done. The trick is choosing the right red for your skin tone—blue-based reds (cherry, crimson) flatter cool undertones, while orange-based reds (tomato, brick) work on warm skin.
2. Pink Gradient
Tools: 3 pink shades (light, medium, dark), makeup sponge
Paint each nail a different shade of pink, lightest on the pinky, darkest on the thumb. No blending required—just five different pinks in a row. It looks intentional and coordinated with zero skill involved.
3. Single Heart Accent Nail
Tools: Base color, contrasting color, toothpick
Paint all nails your base color. On one ring finger, use a toothpick to place two small dots side by side, then drag each dot downward to meet at a point. That's a heart. It's messier than you'd think on your first try. Do it on a piece of paper first.
4. Polka Dot Romance
Tools: Base color, dotting tool or bobby pin
Apply your base color. Dip the tip of a bobby pin or dotting tool into a contrasting color and press onto the nail surface. Scatter dots randomly or line them up. Random usually looks better because the imperfections blend into the pattern.
5. Glitter Accent Nail
Tools: Solid color, glitter polish
Four nails in a solid Valentine's color. One nail—ring finger, traditionally—in full glitter. This has been a mainstay since at least 2015 and it still works because the contrast is inherently eye-catching. Use a chunky glitter for more impact, fine shimmer for subtlety.
6. Half-and-Half
Tools: Two colors, striping tape or steady hand
Tape a straight line diagonally across each nail. Paint one side red, the other pink (or white, or nude). Peel tape while polish is still wet. The line won't be perfect. That's fine. Slightly imperfect geometric designs still read as intentional.
7. Matte Red Finish
Tools: Red polish, matte top coat
Same as classic red, but with a matte top coat instead of glossy. The texture difference is dramatic. Matte red reads as moody and editorial rather than classic. Essie and OPI both make affordable matte top coats that actually work.
8. French Tips in Pink
Tools: Nude base, pink tip color, guide stickers (optional)
A Valentine's twist on the French manicure. Instead of white tips, use a soft pink or hot pink. Tip guides (those little curved stickers) cost about $2 and eliminate the need for a steady hand. Apply guide, paint tip, remove guide while wet, seal with top coat.
9. Mismatched Pastels
Tools: 5 different pastel shades
Each nail a different pastel—baby pink, lavender, mint, peach, sky blue. No nail art required. The variety IS the design. This works especially well on shorter nails where there isn't much canvas for detailed art anyway.
10. Simple Rhinestone Accent
Tools: Base color, small rhinestones or gems, top coat or nail glue
Paint your nails. While the top coat is still tacky, press a single small rhinestone onto one or two accent nails near the cuticle area. Seal with another layer of top coat. One stone per nail. Don't overdo it. Restraint is what makes this look expensive rather than craft-project.
11. Hand-Painted Hearts
Tools: Thin brush, two colors
Using a thin brush instead of a toothpick gives you cleaner, more defined hearts. Paint your base. Let it dry completely—fully dry, not just touch-dry. Then use the brush to draw hearts in various sizes. A heart is just two curved strokes meeting at a point. Practice three or four on paper first.
12. Red Marble Effect
Tools: Red, white, and pink polish, thin brush or toothpick
Apply a white base. While it's still wet, drop small dots of red and pink onto the surface. Use a toothpick to gently swirl them into each other. Don't over-mix—two or three swirls max. The beauty of marble is in its randomness. Every nail will look different, and that's the point.
13. Negative Space Hearts
Tools: Thin brush, one color, top coat
Paint a heart outline on your bare nail using a thin brush. Leave the inside of the heart unpainted—your natural nail shows through. Fill in the rest of the nail around the heart with color. The negative space creates a modern, graphic look that photographs incredibly well.
14. Aura Nails (Pink-Red Gradient)
Tools: Makeup sponge, pink and red polish, white base
Apply a white base coat. On the sponge, dab pink in the center and red around the edges. Press onto the nail in one or two light bounces. The colors blend on the sponge to create a soft, glowing gradient. Clean up the edges with an acetone brush.
15. Valentine's French with Heart Tips
Tools: Nude base, red polish, thin brush
Instead of a straight French tip line, paint small connected hearts along the tip of each nail in red. It's the same V-shaped motion repeated. The key is keeping the hearts consistent in size, which gets easier after the first two nails.
16. Watercolor Hearts
Tools: Thin brush, polish thinned with top coat
Mix your red or pink polish with clear top coat to create a translucent wash. Paint loose, overlapping hearts on a white base. The transparency creates a watercolor effect that looks delicate and artistic. Two or three layers of different dilutions add depth.
17. Chrome Accents
Tools: Chrome powder, gel top coat (or chrome polish)
Paint your base color, cure or dry. Apply chrome powder to one or two accent nails using a silicone applicator or your fingertip, rubbing in small circular motions. Chrome over red gives a metallic cherry finish. Chrome over pink gives a rose gold effect.
18. Geometric Love
Tools: Striping tape, two to three colors
Use striping tape to create angular geometric patterns on each nail. Paint each section a different color—red, pink, nude. Remove tape while wet. The clean lines give a modern, structured feel that contrasts nicely with Valentine's romantic theme.
19. Confetti Hearts
Tools: Dotting tool, three to four colors
On a nude or white base, use a dotting tool to create tiny hearts in multiple colors scattered across each nail. Think of it as an upgraded version of polka dots. Mix red, pink, lavender, and gold for a festive confetti effect.
20. Stamped Patterns
Tools: Stamping plate (heart/love designs), stamper, stamping polish
If you own a nail stamping kit, Valentine's plates are some of the most commonly available. Apply your base color, pick up the design from the plate, press onto nail. Stamping has a learning curve—your first attempt might smear—but once you get the pressure right, it's one of the fastest ways to get intricate designs.
21. Two-Tone French
Tools: Two contrasting colors, guide stickers
Classic French tip technique, but paint the body of the nail red and the tip pink. Or the body nude and the tip a deep burgundy. The two-tone effect adds visual interest without requiring any freehand painting skills.
22. Abstract Swirls
Tools: Thin brush, two to three colors
On a white or nude base, paint loose, flowing swirl lines in red and pink. Let the lines overlap and curve naturally. Think 70s psychedelic meets Valentine's Day. The imperfection is part of the aesthetic—overly precise swirls look stiff.
23. 3D Heart Embellishments
Tools: Acrylic powder or builder gel, thin brush, mold (optional)
Sculpt tiny 3D hearts directly on the nail using acrylic or thick builder gel. These sit raised off the nail surface and catch light dramatically. The challenge is keeping them small enough to be wearable—oversized 3D elements snag on everything.
24. Intricate Floral with Hearts
Tools: Thin brush set, five to six colors
Combine detailed flower designs with heart motifs. Paint roses or cherry blossoms intertwined with small hearts on two or three accent nails. This requires confident brush control and the patience to build up layers of detail.
25. Encapsulated Glitter Hearts
Tools: Gel base, heart-shaped glitter or sequins, gel top coat, UV lamp
Apply gel base, cure. Place heart-shaped sequins or cut-out glitter onto the tacky surface. Arrange them. Cure again. Apply a thick gel top coat to encapsulate everything in a smooth, glass-like finish. The sequins float beneath the surface.
26. Airbrushed Gradient
Tools: Nail airbrush kit, red and pink paint
If you own a nail airbrush (they start around $30), Valentine's gradients are where it shines. The transitions between colors are impossibly smooth—something you can't replicate with sponges. Layer red fading into pink fading into white for a professional ombré.
27. Hand-Lettered "LOVE"
Tools: Ultra-thin brush, steady hand, patience
Paint individual letters across four nails: L-O-V-E. Each letter on one nail, in a handwritten script style. The difficulty is getting consistent letter sizing across nails and making the script look fluid rather than blocky.
28. Stained Glass Effect
Tools: Black gel liner, multiple translucent gel colors
Outline heart and geometric shapes with thin black lines, then fill each section with a different translucent color. Cure between sections. The result looks like an actual stained glass window. This technique requires gel products—regular polish is too opaque for the translucent effect.
29. Velvet Texture Hearts
Tools: Flocking powder, gel polish, UV lamp
Apply gel polish hearts, then press velvet flocking powder into the uncured gel. Cure. The hearts have an actual fuzzy, velvet texture that you can feel. Clean away excess powder carefully.
30. Complex Marble with Gold Veins
Tools: White, red, pink polish, gold chrome powder or gold striping brush
Create a marble base (same technique as #12 but with more controlled swirling), then add thin gold veins using a striping brush or gold chrome details. The gold elevates basic marble into something that looks custom and luxurious.
31. Sculpted Bow Details
Tools: Acrylic powder, thin brush, monomer
Sculpt three-dimensional bows on accent nails using acrylic. This is a competition-level technique that requires understanding how acrylic sets and how to shape it while it's still pliable. Start with one nail and see if you have the patience for all ten.
32. Multi-Texture Mix
Tools: Matte top coat, glossy top coat, chrome powder, glitter
Different textures on different nails—one matte, one glossy, one chrome, one glitter, one velvet. Same red color across all five, but every surface catches light differently. The unified color with varied texture creates a cohesive-but-interesting set.
Salon Visit vs. DIY Investment
Salon
$35-120+ (Single visit depending on complexity)
DIY
Under $25 (Complete starter kit that you keep forever)
A basic Valentine's manicure with art runs $35-65. Elaborate sets with 3D elements hit $100+. DIYing pays for itself in one session.